You can use effects to correct color and brightness; however, they can also be used to add animation, produce overlays, and create greenscreen effects.
In this article, we will learn about:
-
The Effects Workspace
-
Applying effects to clips
-
Animating effects with keyframes
-
Copying and pasting effects
-
Creating effect presets
-
Keying and compositing
-
The Garbage Matte
The Effects Workspace
When you want to edit effects, you go to the Effects workspace, which is made up of the Effect Controls panel, the Program Monitor, and the Effects panel.
To reach the Effects panel, go to Window> >Effects.
You can see the Effects panel in the snapshot below.
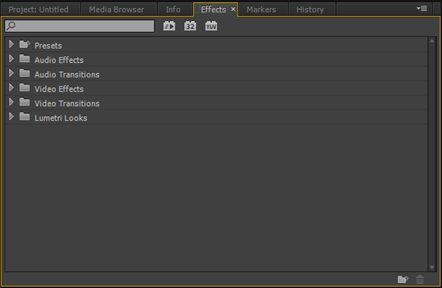
The Effects panel is where you find all effects. The Effect Controls panel is where you will configure the effects. Finally, the Program Monitor is where you can preview the effects that you add.
Adding an Effect to a Clip
To add an effect to a clip, drag the effect from the Effects panel onto the clip on the Timeline.
As an example, we are going to drag the Edge Feather effect to our clip.
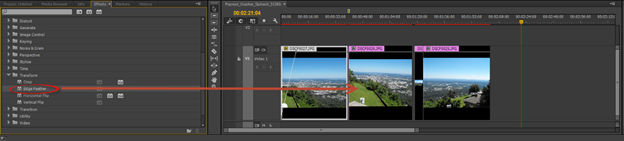
You can also select a clip in the Timeline, then double click on the effect in the Effects panel.
Customizing an Effect
Once you have added an effect to a clip, you can go to the Effect Controls panel to customize it.
We added the Twirl In effect to a clip.
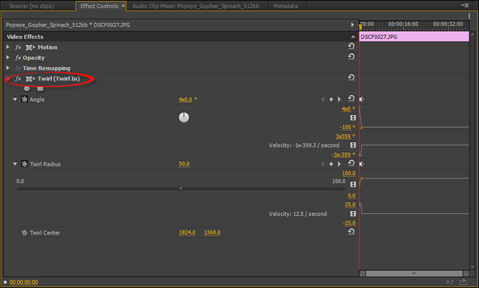
By going to the Effect Controls panel, we can adjust the effect by changing the values and parameters.
You can also toggle the effect on and off to see the impact of the effect on your clip.
Toggle an Effect On or Off
To toggle an effect off, click the fx icon that appears to the left of the effect name.
When you do this, the effect is disabled.
To turn the effect back on, click the fx icon again.
Changing the Order of Effects
The order that effects will appear on your clip is shown in the Effect Controls panel.
To change the order of effects on the clip, drag an effect up or down in the Effect Controls panel.
You will see a horizontal bar to let you know where the effect will be placed when you release the mouse.
Just remember that you cannot drag standard effects above fixed effects. You also cannot drag fixed effects below standard effects.
Removing an Effect
To remove an effect in the Effect Controls panel, select the effect.
Next, either press the Backspace or Delete key on your keyboard.
You can also right click on an effect, then choose Clear.
To remove an effect in the Timeline, select the clip or clips, then right click on the clip and select Remove Effects.
You will then see the Remove Effects dialogue box.
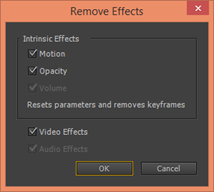
Check the effects that you want to remove.
NOTE : Intrinsic effects are fixed effects.
Click OK to remove the effects.
Animating Effects with Keyframes
Now we are going to use keyframes to animate effects that we have applied to clips in the Timeline.
Adding Motion to Effects
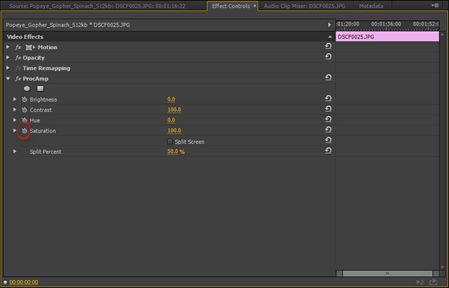
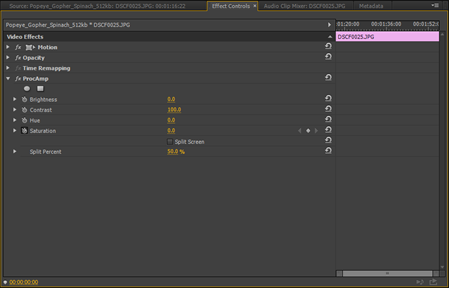
To add motion to effects using keyframes, start out by adding the ProcAmp effect to a clip in the Timeline.
Next, move the playhead in the Timeline to the start of the clip.
Go to the Effect Controls panel. Click the triangle to the left of the effect to see the configuration options, as pictured below.

Click the Toggle Animation button to the left of the effect that you want to configure so that keyframes are enabled.
We are going to click the Toggle Animation button to the left of Saturation.
Now adjust the value for Saturation. We are going to adjust ours to 0.
Now, move the playhead to the second location so you can set the keyframe for the second effect.
We are going to move our playhead toward the end of the frame and restore Saturation to 100.
With the keyframes added, our clip starts out as black and white and turns to color.
Applying Effects to Multiple Clips Using Keyframes
Needless to say, you can spend a good bit of time selecting the right effect for a clip, then perfecting it using keyframes. Wouldn't it be nice if you had a way to copy that effect and keyframes so you could apply it to other clips in your current and future projects?
The good news is you can by creating a preset that you can drag onto a clip in the current project – or even a future one. We are going to show you how to do that.
Copying Effects and Keyframes
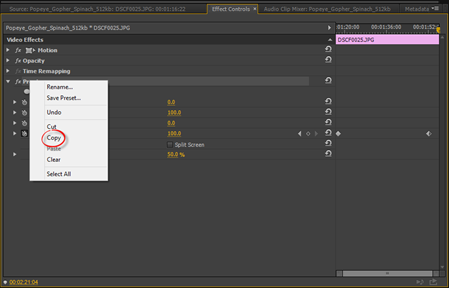
As our example, we are going to copy the effect and keyframes from the last section when we had our clip go from black and white to color.
To copy the effects and keyframes from a clip, go to that clip in the Timeline.
Next, go to the Effect Controls panel.
Select the effect that you want to copy, then right click and select Copy.
Now, go back to the Timeline and select the clip you want to paste the effect onto.
Go to the Effect Controls panel.
Click anywhere in the panel, right click, then click Paste.
Creating an Effect Preset
You can also create an effect preset to that the effect you created can be used in future projects.
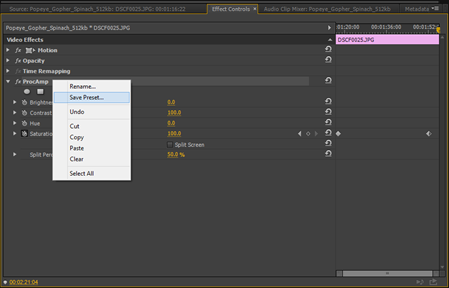
To do this, click the clip that contains the effects in the Timeline.
Go to the Effect Controls panel.
Select the effects that you want in the preset, then right click and select Save Preset.
You will then see the Save Preset dialogue box.
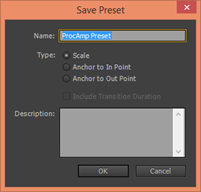
Type in a name for the preset, then choose a type:
-
Scale will scale the keyframes proportionately over the length of the frame when you apply the preset. It deletes existing keyframes.
-
Anchor to In Point applies original keyframes to the beginning of the clip. It does not adjust for any differences in duration as with Scale.
-
Anchor to Out Point applies original keyframes to the end of the clip without adjusting for duration.
Click OK to save the preset.
You will be able to find the preset in the Presets folder in the Effects panel.
Keying and Compositing
Compositing is defined as combining two images in a scene and making it appear as if they were shot together.
Keying is also known as greenscreening or chromakeying. It involves replacing a color in an image with parts from a background image. Typically, the color green is replaced with a background image. Greenscreening is used for network news during weather forecasts.
The Ultra Key effect in Premiere Pro makes keying really easy. However, here are some things you can do to make it even easier for you:
1. Use a camera that has a raster sensor.
2. Use a camera that does not interpolate to attain HD resolution. HDV cameras do this.
3. Use a camera with a high ISO starting value.
4. Use the camera with no gain.
5. When you record your footage, record in progressive instead of interlaced format.
6. Record at the highest bitrate.
7. Make sure the background is evenly lit.
8. If you are filming one subject, such as a person, use a tripod L bracket and mount the camera vertically for higher resolution and higher pixel density around the subject.
For keying, you will record your subject with a certain color background, usually green. You will want to make sure the subject does not wear any green so parts of the wardrobe are not cut out.
Using the Ultra Key Effect
Create a sequence using your greenscreen footage that you shot with your camera by dragging it to the New Item button in the Project panel.
When you do this, you will be able to see the footage in the Program Monitor.
At this point, you can rename the sequence if you want and even organize it in a bin.
Next, go to the Effects tab. Find the Ultra Key effect by typing "ultra" in the search box (in the Effects panel).
Now drag the Ultra Key effect to the clip in the sequence.
Keying Out a Color
To key out a color (green for greenscreening), go to the Effect Controls tab.
You will see the Ultra Key effect.
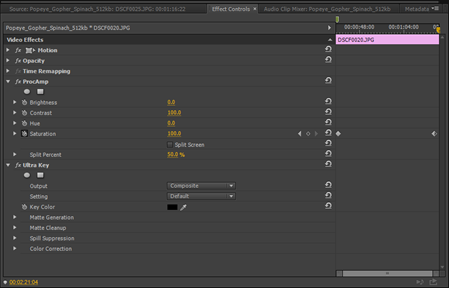
Hover your mouse over the eyedropper tool. The mouse pointer will then change to an eyedropper tool.

Use the eyedropper pointer to select the background color in your clip showing in the Program Monitor.
When you do this, the background color changes to black. If you had a green background, it would now be black.
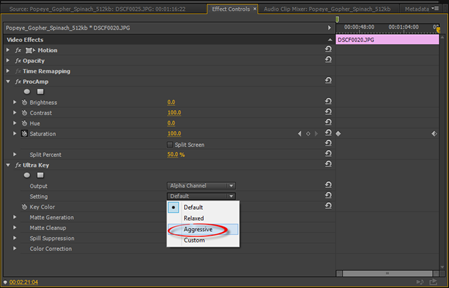
Next, go to the Effect Controls panel again.
Select Alpha Channel in the Output menu.

Now your video clip is a black and white clip.
Select a Setting Preset.
We are selecting Aggressive. You can try each preset to find one that works best for you.
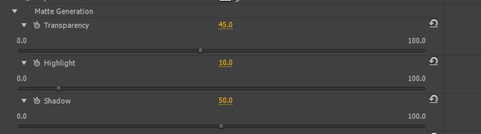
Next, click the triangle to the left of Matte Generation. You will then see Transparency, Highlight, Shadow, Tolerance, and Pedestal.
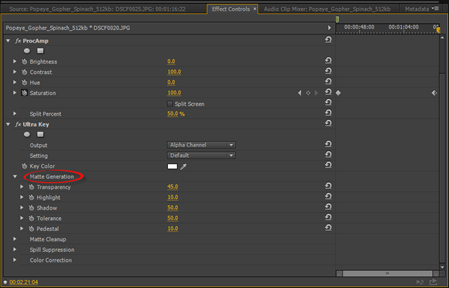
These will adjust how the matte is interpreted.
Repeat this step for Matte Cleanup, Spill Suppression, and Color Correction.
Drag the sliders to the right to increase the effect of the adjustment or to the left to decrease the effect.
Once you are finished with all the adjustments, select Composite from the Output menu.
You will then see the key in the Program monitor.
Next, move the keyed clip to Track V2 if it is not already showing there.
Drag the background to V1. Your background should always be on a lower track.
Right click on the background. Select Scale to Frame Size.
When that is finished, select the video clip in the Timeline.
Go to the Effect Controls panel.
Click the triangle to the right of Motion Controls. Now you can adjust Position, Scale, and Rotation.
Cleaning Up the Edges around a Key
You can remove unwanted edges around a greenscreen key by using a garbage matte.
To use a garbage matte, go to the Effects panel. The garbage matte effect is found in the same folder as the Ultra Key effect.
Drag and drop one of the garbage mattes onto the keyed footage.
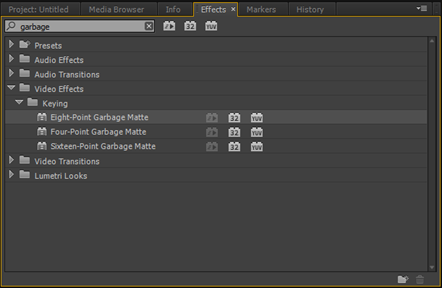
Drag the effect onto the foreground clip.
Next, go to the Effect Controls panel.
Go to the Garbage Matte effect.
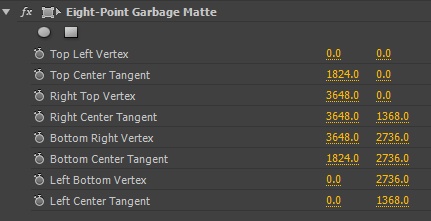
We chose an Eight Point Garbage Matte, so we see eight handles appear around the footage.
Grab a handle and bring them in (one handle at a time) until it is like you need it to be.
When you are finished, click an empty space in the Timeline.