Arranging Wedding Flowers!
-
Arranging flowers for a wedding takes a great deal of planning. Only well-experienced floral designers should undertake the preparation of all the flowers required for a wedding.
If you are just starting out in your career and you wish to get involved in arranging flowers for weddings, find someone who is currently working in that field and offer to help, to assist, or apprentice. You will learn a great deal that you can apply to your own business without losing a lot of money making costly mistakes because you aren't very experienced yet.
It's one thing to make a mistake on a bouquet or small arrangement. You can usually fix it quickly.
However, wedding flower budgets range from a few hundred dollars to tens of thousands of dollars. Know your abilities. Know your limitations. Floral designers tend to cater to a certain type of wedding, and they know when to turn a potential client away.
Learning to manage flowers for a single wedding, perhaps for a friend is one thing. Agreeing to create all the flowers required for a full wedding is something else. Make sure you have had some experience before you take on a client.
Planning and Ordering
The first thing you need to consider is the date of the wedding and then getting a list of colors and flower requests from the bride.
With this, you will check with your floral supplier who has the experience to let you know if the Bells of Ireland your bride wants for her March wedding are available.
Meet with your bride to establish a budget and specific requirements for her wedding flowers. As a rule of thumb, wedding flowers will contain any or all of the following flower arrangements (and many others):
Personal Flowers:
-
Bridal Bouquet
-
Groom Boutonniere
-
Bridesmaids' Bouquets
-
Groomsmen Boutonnieres
-
Flowers for the Mothers
-
Flowers for the Fathers
-
Grandmothers
-
Flower Girl
-
Ring Bearer
Decorations:
-
Ceremony flowers
-
Topiaries
-
Altar Arrangements
-
Arches
-
Pew End Decorations
-
Window Ledges
-
Tabletop centerpieces
-
Guest Book table
-
Gift Table
-
Tabletop Arrangements
-
Buffet Table
-
Wedding Party Table
Take the order for the wedding, the deposit, and plan your approach! Note.order extra flowers to manage errors or mistakes, or an unexpected oversight on the part of he bride.
Table Arrangements
Table arrangements are usually given a great deal of consideration because at a typical wedding, guests arrive at the reception area long before the bride and groom, giving them plenty of time to look at the arrangements.
This is where you want people to say, "Wow!" Your arrangements need to be stable, secure, and stunning.
Professional Note: When working at a reception venue, make sure you know the rules, and who is in charge. Leaving water, flower trash, or papers lying about after you leave will not give the venue a good impression of you. You will not be recommended for future weddings. Also, in terms of safety, the venue coordinator has the final say with regard to your decorations.
One wedding we recently worked on ordered alternating tabletoppers. Half of them were to be flat on the table. The other half were to be identical arrangements, but then balanced on a three foot tall glass vase in which three miniature calla lilies had been placed. They turned out well. They were beautiful. And in the studio they were stable.
However, the venue was outdoors, and the wind was blowing. Because we used live flowers, the arrangements were heavy with saturated floral foam. On the top of a glass vase in the wind, it was perilously unsteady. To our disappointment, they ruled that we could not use the tall vases outdoors. There was too great a risk of danger to one of the guests.
The tabletoppers are illustrated at the beginning of this article. Here we are removing the one that the venue coordinator said we were not allowed to use.
The venue coordinator is the final word, and you do want to stay on this person's good side, because they are the ones who recommend floral designers for brides who shop their venue to reserve a place for their wedding and/or reception.
Remember when you are planning your tabletop arrangements, you must be sure that the people sitting at the table can either see over them.
.or see through them!
For this wedding, the bride chose mini calla lilies, gardenias, yellow cymbidium orchids, yellow oncidium orchids, yellow mokara orchids, tulips, freesia, and bright white hydrangea. Notice the use of the cut lemons in the glass tabletop vase.
Notice the sweet yellow tulips inside the tall vase. This still allows you to see through the vase, but gives some eye-level interest. Can you see how some of these arrangements could keep talking for quite some time?
Now this next wedding was really fun. Look at how the bride chose really bright and fun colors, went with a galvanized tub for the base of her table arrangements, and then still mixed it with beautiful table linens.
There is no limit to what you can do. You just have to have an imagination, some determination to learn as much as you can about the business, and most of all, listen to your client.
Here we have a couple of tall tabletop topiary examples. Again, these make it easy to see the person sitting across from you, but they have a great deal of interest because they are so unique.
Here is a table full of tabletoppers. All the same colors used, but they are not identical. See how using the same colors, just in different mixtures makes for a varied yed coordinating palette?
Decorating the Church or Ceremony Venue
Decorating the wedding venue used to mean that you would decorate a church. Today's brides are looking more often to having their ceremonies outside.
This can be really beautiful, but it is not without its challenges. Wind and rain can complicate matters, so always try to have a "Plan B".
This was a truly beautiful wedding, beside a lake with a fountain blowing. However, in this case the wind became an issue just as the bride was ready to go down the aisle. Fortunately, everything held and the ceremony went off without a hitch, but the floral designer was holding her breath the entire time!
In keeping with the Romans, today's bride loves to decorate with rose petals. Preparing petals requires some of the same steps as when you prepare roses for arranging.
Because you want to keep the petals as fresh and as opened up as possible, clean the roses as you have been taught so far. If the roses are still pretty tightly bunched, leave them in a bucket at room temperature for 24 to 48 hours. Within that time, the roses will have opened up dramatically. At that point grasp the top of the stem just underneath the rose head with one hand, grasp the entire flower head with the other hand and pull them apart.
When you get experienced at this you can behead several dozen roses in just a short time! We store our rose petals in ziplock bags in the floral cooler. Most of the time we keep the colors separate.
You can create some really beautiful decorations by using two different color rose petals. One couple used red and white and we arranged the initial of their last name in red petals surrounded by white petals.
Most brides like to line the aisle with petals, and they are often used at the reception to decorate the tables.
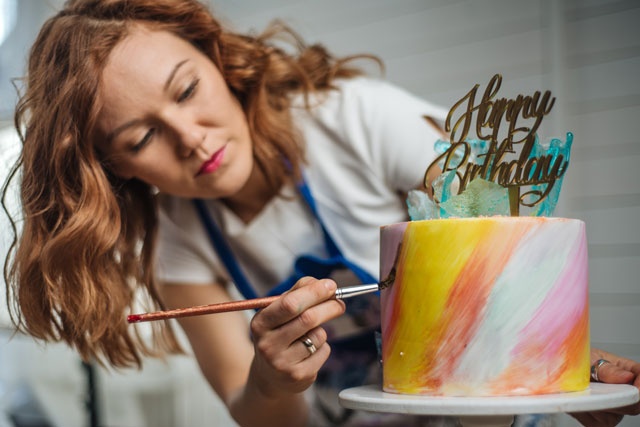
Wedding Cakes
Decorating wedding cakes with live flowers is a very common occurrence. Most brides have very definite feelings about how they want the cake decorated. Other times, you can use your imagination. Always bring a lot of extra flowers to the set up as you never know what you will need until you're done.
Carnations' scientific name 'Dianthus caryophyllus' means 'flower of the Gods'.
Some people believe that the name comes from 'corone' meaning 'floral garland'.
It is the national flower of Spain and they come in all natural colors ranging from white to red.
Carnations are many times related to feelings. The red carnation symbolize deep love, white represents pure love and yellow represents dejection.
It is said that carnations first grew from Mother Mary's tears seeing Jesus carrying the cross to calvary.
In France and francophone cultures, carnations stand for bad luck and misfortune.
Personal Flowers for the Bride, Groom, Attendants, and Family
Making the personal flowers for a wedding is very much an artistic endeavor.
Number one, you want to please your bride with her bouquet. Naturally you want her to be bowled over by all the flowers, but there is nothing quite like a bride who bursts into tears when you hand her a beautiful bouquet of flowers.
Number two, you want to make sure the flowers last, look good, and complement the bride. You may have to give your bride some direction on what type of flowers would work for a flower for her groom, choosing tender Lily of the Valley might not be a good choice. One or two "man hugs" and that tender blossom is ruined.
Corsages and Boutonnieres are generally created from similar colors to the bridal bouquet, or they can compliment the colors of the rest of the wedding.
You're in for a surprise.
You have already learned the skills to make the Bridal Bouquet, the corsages, and the boutonnieres.
This section will help you to put everything together.
Bridal Bouquet
Back about 30 years ago, many of the bridal bouquets were cascades, with the round portion of the bouquet and then a long trailing cascade down the front. This has gone out of fashion for now, but as with all fashions, may end up coming back at some point in the future.
Until then, the going trend for bridal bouquets is a large bunch of flowers, arranged just as you designed the hand-tied bouquet.
There is one difference for a bridal bouquet.you will not criss-cross the stems. For the bouquet, all the stems will be parallel to one another so that it is easy to tie this bouquet in place.
You still begin in the middle of your bouquet, and you work around in circles, bringing the stems down slightly with each row so that by the time you are done, the flowers for a beautiful canopy over the top of the bunch of stems.
Notice the bride's bouquet is almost completely round.
It's actually not good enough to count flowers, because all flowers are by nature, sized differently. I recommend going for "look" rather than a recipe of flowers.
Bridal Bouquet by White Poppy Floral of Phoenix, Arizona
Bridesmaids, Flower Girls, Kissing Ball
Here, the bridesmaids' bouquets are all Bells of Ireland, A completely monochromatic approach Because these are such large blossoms, you don't need very many per bouquet, but they must be placed very strategically. In order to maintain the rounded dome top and tapering along the sides, watch your placement very carefully.
Professional Tip: When working on the bridesmaids' bouquets, work on all of them at the same time, or pull them out of the cooler as you are working on them so that they are as similar as possible. Even if you use a different color, you want them to be approximately the same size.
These bouquets were made with Gerber Daisies and Craspedia in colors to match the dresses. Fun!
Here is a bridesmaid bouquet of peonies, purple hydrangea, freesia, cabbage roses, and lisianthus. The bride's bouquet is of all the same flowers, but all in white.
This is called a "Kissing Ball" and it is created by inserting flowers into a well saturated round Oasis ball. A ribbon is strung through the ball to be used both decoratively and as a hanger.
Corsages, Boutonnieres
Get out those notes, and let's get down to work. All the remaining arranging you will learn deals with wiring and wrapping flowers so that they can be used either in personal flowers such as corsages and boutonnieres or they will be used in the arrangements for the table top or wedding venue.
Here is the Gerber Daisy we wrapped in a previous section.
If you are working with cymbidium orchids or a similar flower that has either a short stem, or a fragile stem, you will wire it exactly as you wired this Gerber Daisy.
If you are working with a woody stemmed flower such as a rose, you can simply cut the stem to 1 inch, then insert a sturdy wire up the stem from the bottom until it reaches the inside of the rose. This is simply to keep the rose bud from breaking off.
Wrap the bottom of the rose and the wire that is sticking out to a length of about 3 inches. Cut off any of the rest you won't need it.
(Please note: Making corsages is exactly the same process, you will just use more flowers.)
You can go with a single flower as a boutonniere and that can be a striking statement.
It is also nice to soften the look or add a bit of interest. In this case, Adding the linear foliage to the round daisy could provide the type of contrast I'm looking for.
In the case of these woody stems, you don't need to wire them, but if the foliage you choose is fragile, such as the ivy leaf, it needs to be wired and wrapped.
I changed my mind (which happens a lot - this is a very visual activity, and when something looks pleasing, you will know it. When it doesn't, it will scream out at you.)
Here we wired a single astrameria stem and I chose to add the linear foliage because both these flowers were upright and in the same color family. I went for a more unified look for this boutonniere.
Position it where you want it to rest. Usually, you will position it toward the b ack of the flower because it will be pinned against the groom's shoulder and will lie up and down just as shown in the next picture.
Add a large headed pin or two and you're done. For this one, it doesn't weigh very much, so a single pin would do just fine.
However, for a heavier arrangement, always include two pins.
I went back to the ivy and the daisy. I just love how the colors of the ivy and the daisy seem to go, or rather glow together.
This is what this looks like from the backside of the boutonniere. With the wires in place, you can position the leaves any way you like.
Usually I work in odd numbers, but I know I will be adding one more piece to this boutonniere, which will give me the look I want.
Add one piece of the berries from the flowering eucalyptus and I think we're done.
I will point something out here, as I was creating this bout I accidentally tore off some petals from the daisy. Because of this I placed the berries where they are. However, if this were for a wedding, you should make a new one. Don't ever send defective flowers to a wedding.
Ready for Corsages?
On we go.
As with wiring flowers for the boutonniere, gather your flowers, the wire, greenery, and in the case of corsages some coordinating ribbon for a small bow.
A corsage is usually created with two or three flowers.
In this case, I chose three flowers. Typically you place the smallest flower at the top of the corsage, then the other two larger flowers are placed at an uneven triangle below that top flower.
Here is a vivid Gerber Daisy corsage that matches the bridesmaid bouquets you saw previously.
How do you make the ribbon?
Start by taking a ribbon about 3/8" wide and make six loops as shown. There is a little trick, as you create each loop you need to make a half twist at the point where your thumb and forefinger are grasping the bow.
This half twist will make it easy to arrange the bow once it is wired.
The next step is to make four smaller loops on top of these six, using the same half twist method.
Take a length of wire and wrap this as tightly as you can in the center. I leave a length of the wrapped wire, cover it with floral tape and then wrap it into my corsage to keep it in place.
For this corsage, we are using two sweetheart pink roses and two pieces of linear foliage that has tiny pink berries on the tip.
Many times I remove all of the greenery from the roses, but in this case, I really liked how they seemed to cup the roses, so I left it in place.
Wire each piece together as you did with the previous corsage, placing one rose (the smaller one) slightly higher than the other one. Wrap.
Position the greenery and/or berries in place, wrap.
Position the bow. Wrap.
By now you should be an expert wrapping with floral tape!